Share
Explore

 How to Build A Live Audience Polling App To Boost Engagement [Template]
Whether you run a team meeting or all-hands, handling live audience Q&A can be tricky. Instead of custom software, build your own live audience polling and voting doc.
The situation: you are in a team meeting or an all-hands and the main speaker finishes their speech. They open the floor to questions…and crickets. You think of a question, but don’t want to be the first one to raise your hand because you aren’t sure if the question is relevant to everyone in the room (plus it’s nerve-racking to speak in front of a large audience). Someone finally raises their hand, and the person clearly did not read last week’s memo which would’ve answered their question.
Does this sound like any of your team meetings, all-hands, town halls, or conferences?


Source: Tenor
If you want to skip straight to the template, copy by signing up for Coda. You can also watch the video below for how to build the doc.
Popular Polling Tools for Live Q&A


Credit: Poll Everywhere
If you’ve found yourself in the situation above (either as the speaker or as someone in the audience), you’ve probably been frustrated by how inefficient the process can be. If you have an hour-long presentation and leave 10 minutes at the end for Q&A, wouldn’t you want to make the best use of that time by answering the most important questions first?
Several companies have already for this. Here are some of the companies in the space:
Some of the features these apps provide:
What if you want a super simple app to conduct polls for your team to write questions and vote for the ones that matter to them? You don’t need all the bells and whistles of "audience response systems” that you might only use once per month (an all-hands) or maybe once a year (annual sales conference). Internally at Coda, we call this doc a “Dory” adapted from in Finding Nemo who asks a lot of questions 🐠 :). This template also utilizes this question and vote methodology.
I’ll walk you through how to build a Q&A voting doc in Coda below.
Custom Polling Options in Just One Table
Seriously, the entire app is one table. Here is what the final output looks like:


As your team adds questions to this table, other team members can vote for the questions they like in the Vote Up column and vote for the questions that are not relevant in the Vote Down column. Let’s start with the basics of this table and the typical workflow you would see before, during, and after a meeting.
Live Poll Structure for Q&A Sessions
Let’s start by first creating a table with 3 columns:
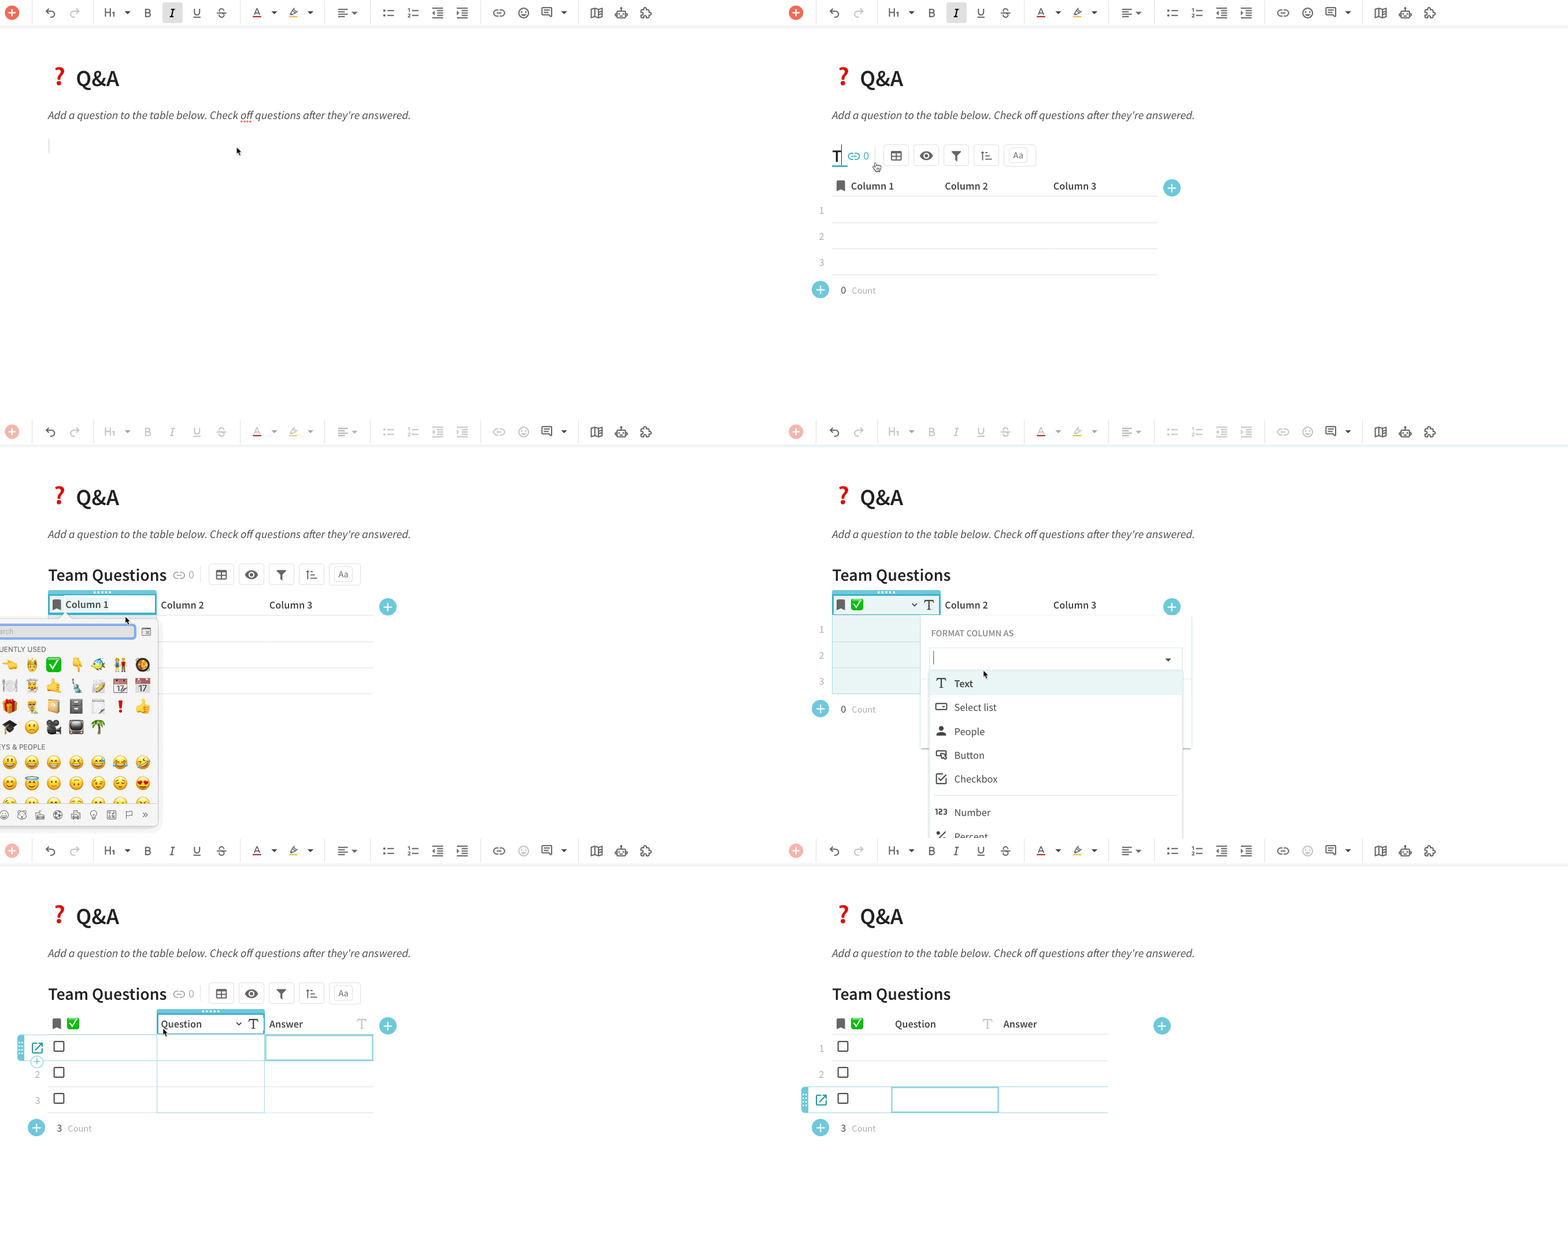

The reason you need the first column of the Checkbox is to mark off the questions once they have been answered in the meeting. We will set up a filter in a future step to remove all the answered questions from our main table and save them in an archived section in the doc. This way, you'll have built in documentation for your virtual events and remote meetings.
What Does The Questions and Answers Workflow Look Like?
Now that we’ve covered the structure of your live polling app, let’s take a look at how it will work to gather feedback in practice.
Before the meeting:
Perhaps a day or an hour before the meeting, you can send out the doc and have people add questions to the main table by clicking the plus sign at the bottom of the table and have them write their question in the Question column. If the question may have already been answered in previous meeting (or the answer is in an e-mail or Slack message somewhere), the meeting owner can insert the answer ahead of time in the Answer column or provide a link to the resource that contains the answer.
During the meeting:
Your team can continue to add questions during the meeting as they come up. Assuming phones and laptops are allowed, the speaker may spark questions from the audience based on what he or she presents. Voting also happens real-time as people see the questions being logged in the table. With our meetings, once the Q&A period starts, we give the audience a minute or so to vote on their favorite questions and then have the speaker answer the ones that bubble to the top.
So far so good. You’re probably thinking: I could get this done in Google Sheets since Google Sheets allows real-time editing by multiple team members. Read on.
Automate Live Q&A With Formulas and Buttons
In the main questions table, we also have a column for the person who raised the question. If you are in a Google Sheet, you would have to manually write in your name in the cell to indicate you asked the question. By using this formula for this column in our table, the column will pre-populate with the user who is adding a row to the table:
=thisRow.CreatedBy()
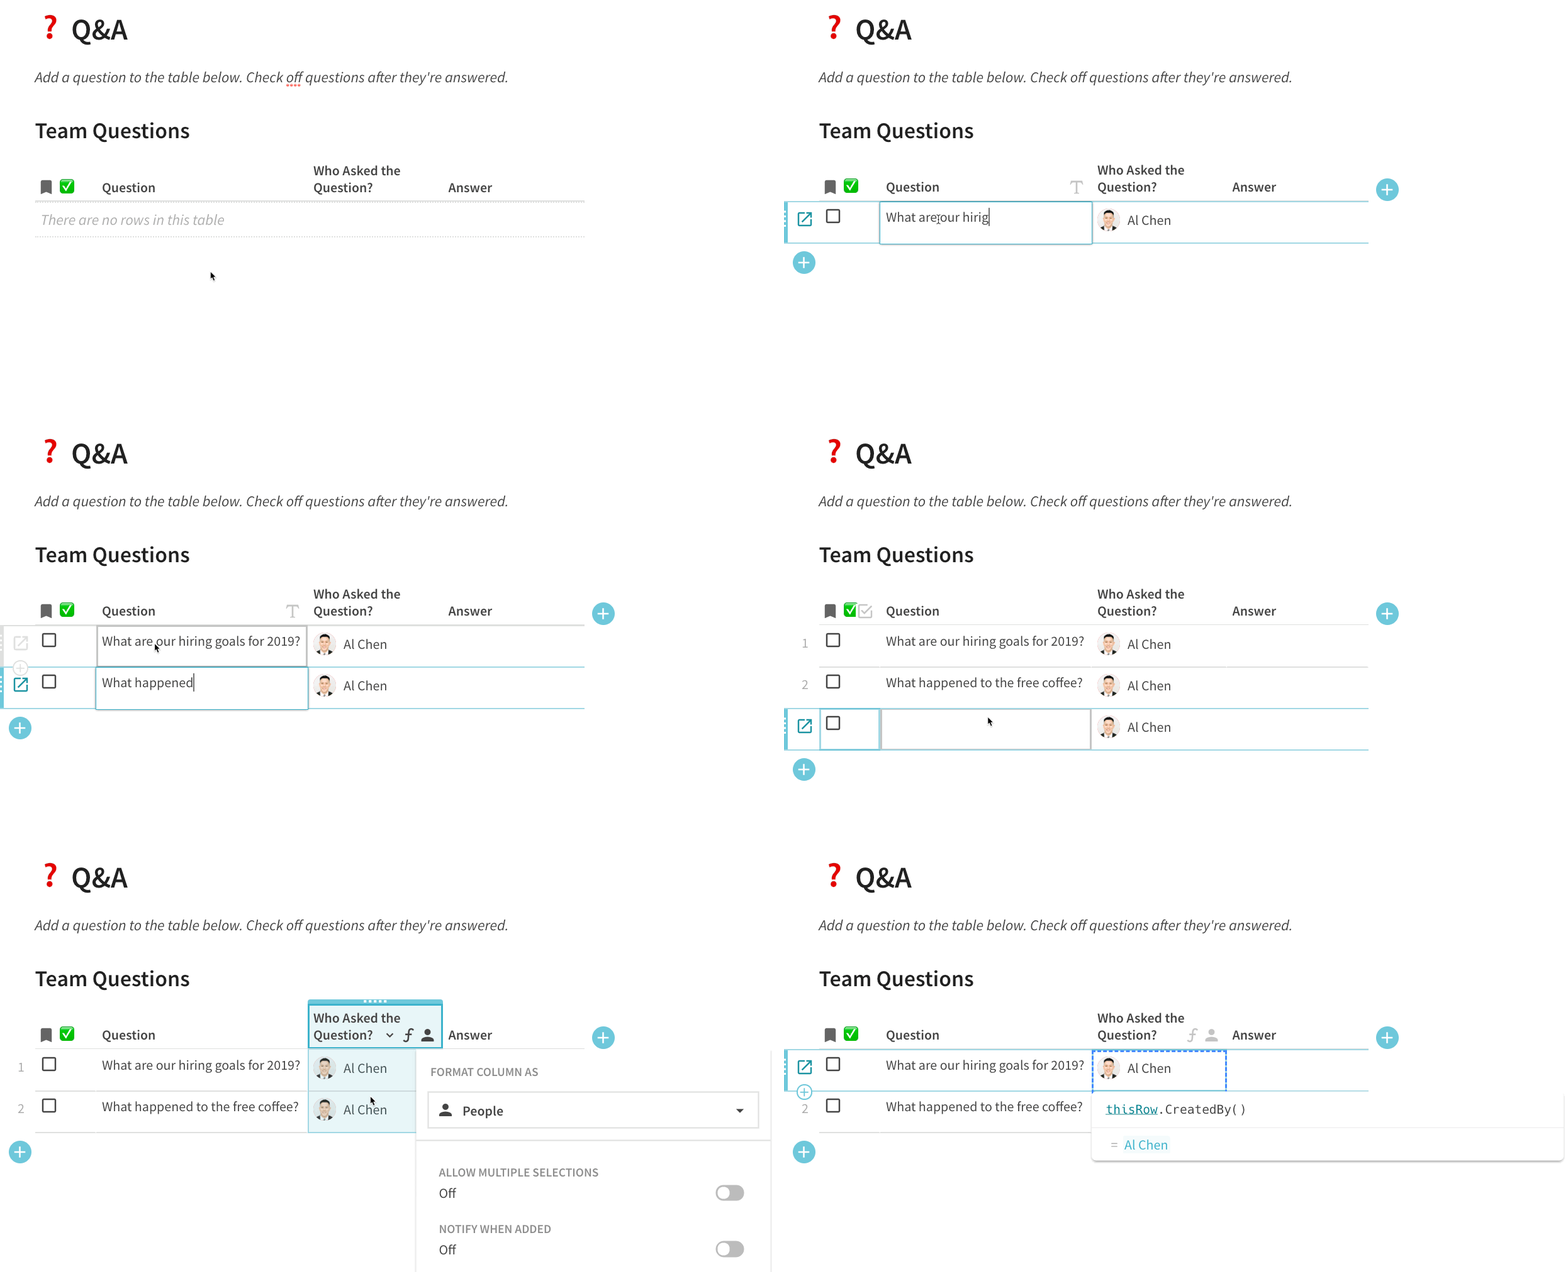

The Who Asked the Question? column is a People column type that shows an avatar of the person on your team. Now let’s also add two more column to capture the people who have upvoted or downvoted a question:
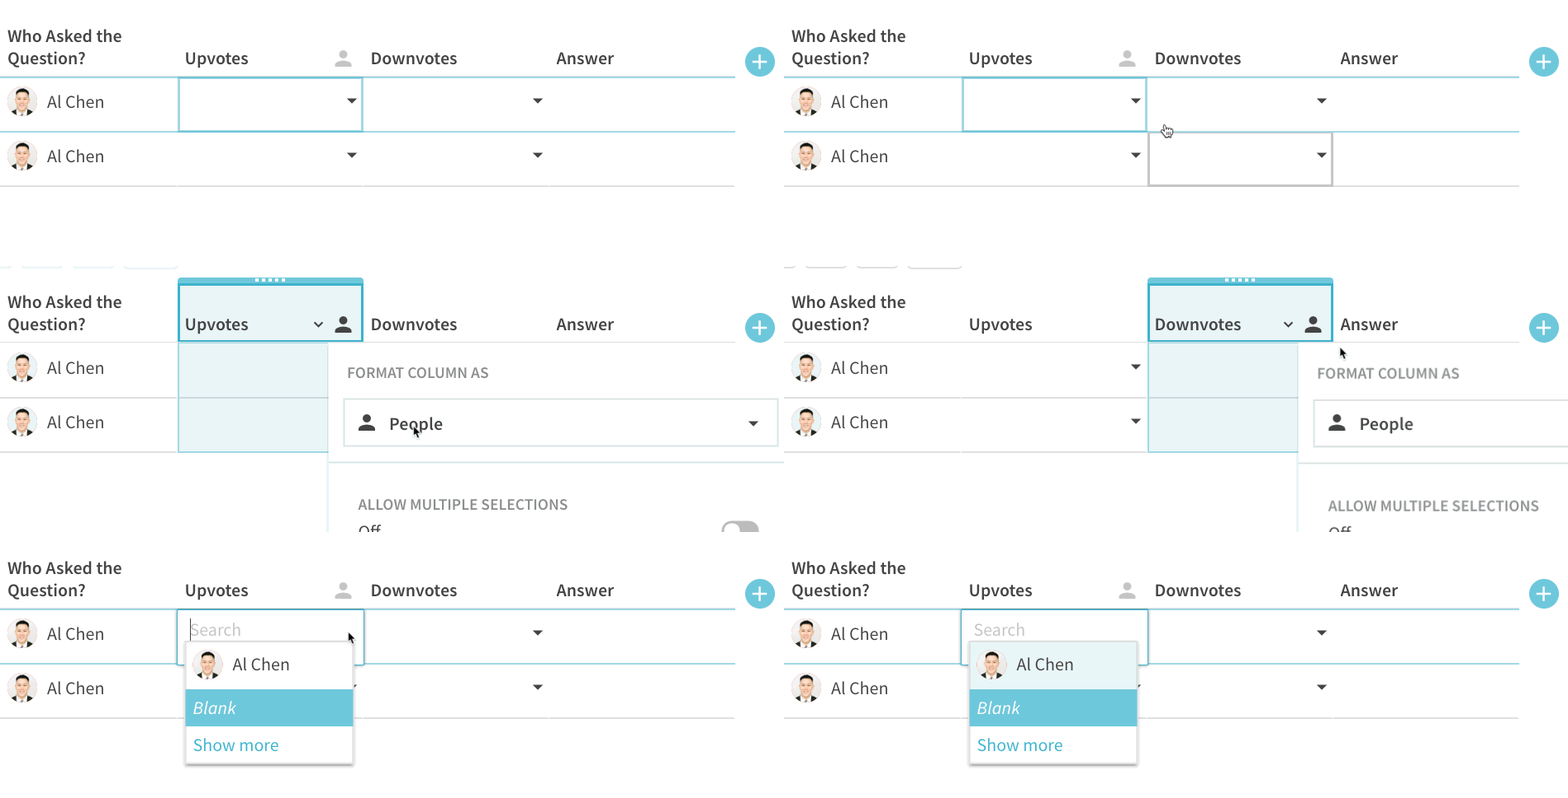

Upvotes and Downvotes are also the People column type since these columns will contain the people on the team that upvoted/downvoted. You also want to make sure the “Allow Multiple Selections” toggle is turned on so that multiple people can show up in the Upvotes or Downvotes columns:


Now for the fun part, adding the buttons! make your table feel more interactive and is a core building block that turns your doc into an app that will drive audience engagement. First start by adding the columns with the :


Before we write the button formulas, let’s just make our buttons look more user-friendly. I like to use the thumbs up 👍 emoji for the upvote button and the thumbs down 👎 emoji for the downvote button. I use a green and red background for the buttons, respectively:
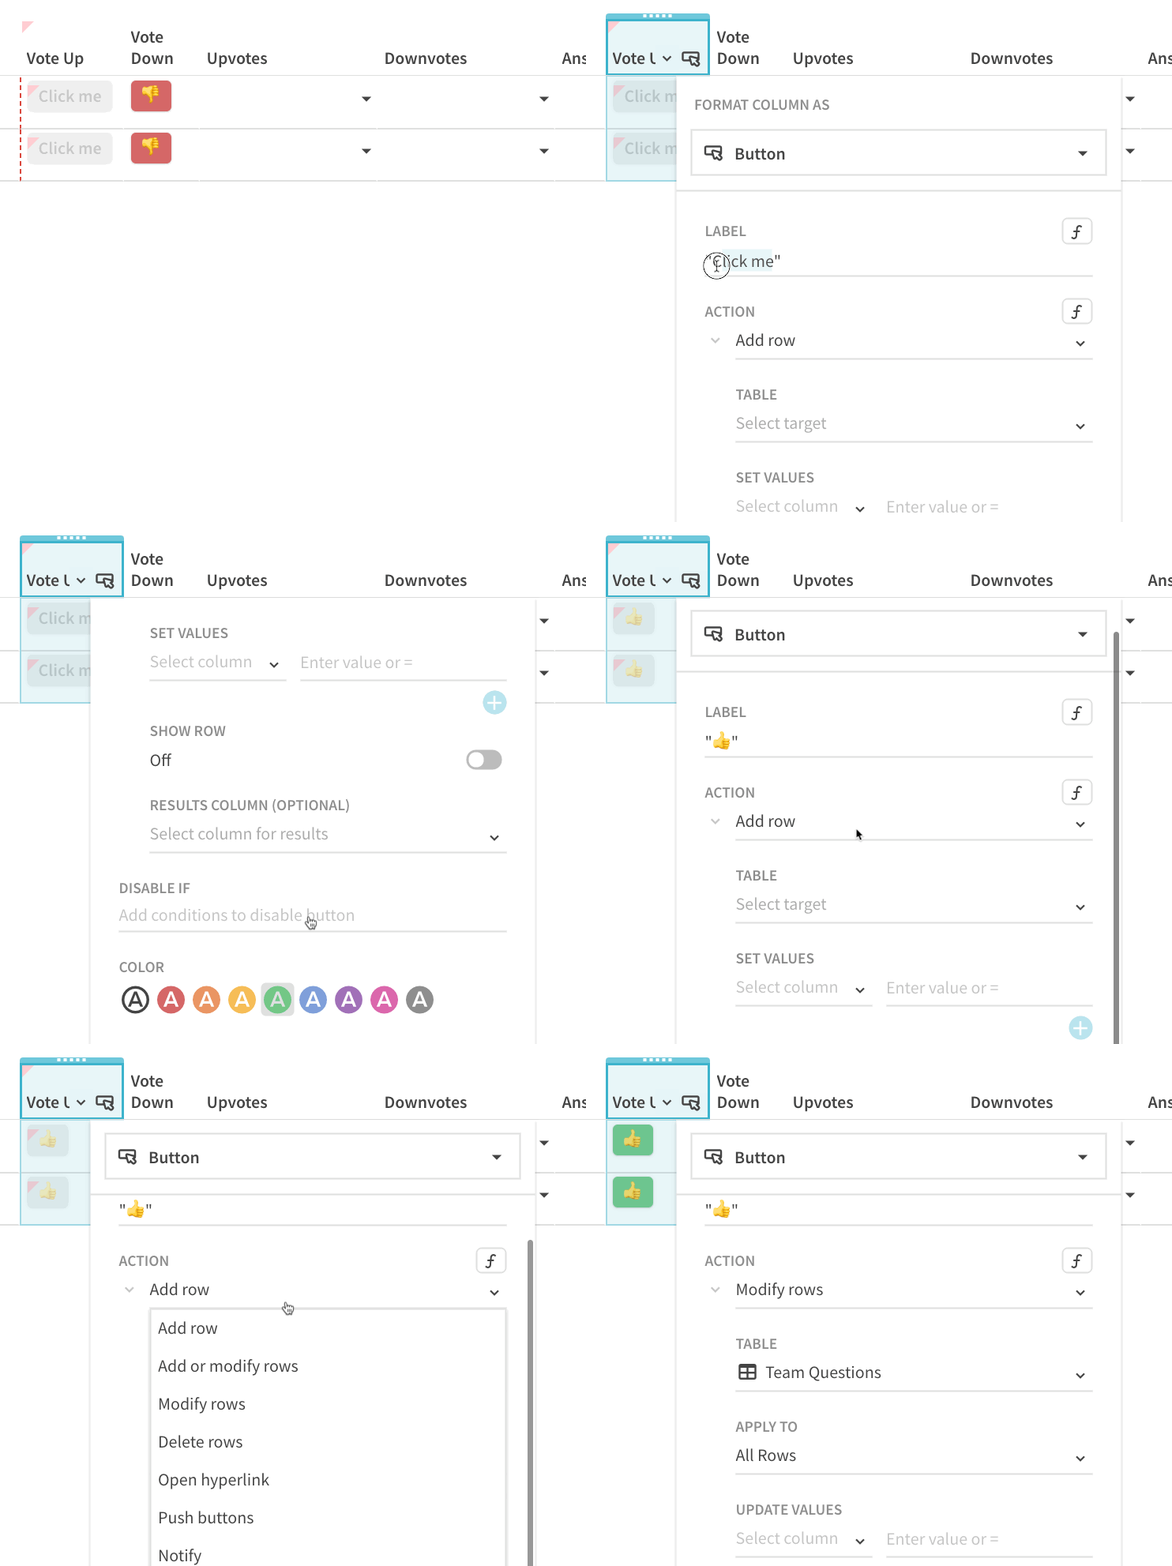

Now we need to configure the buttons with the right formulas so they actually account for who upvotes and downvotes a question. This is probably the most “complicated” formula you’ll have to write to get your doc up and running!
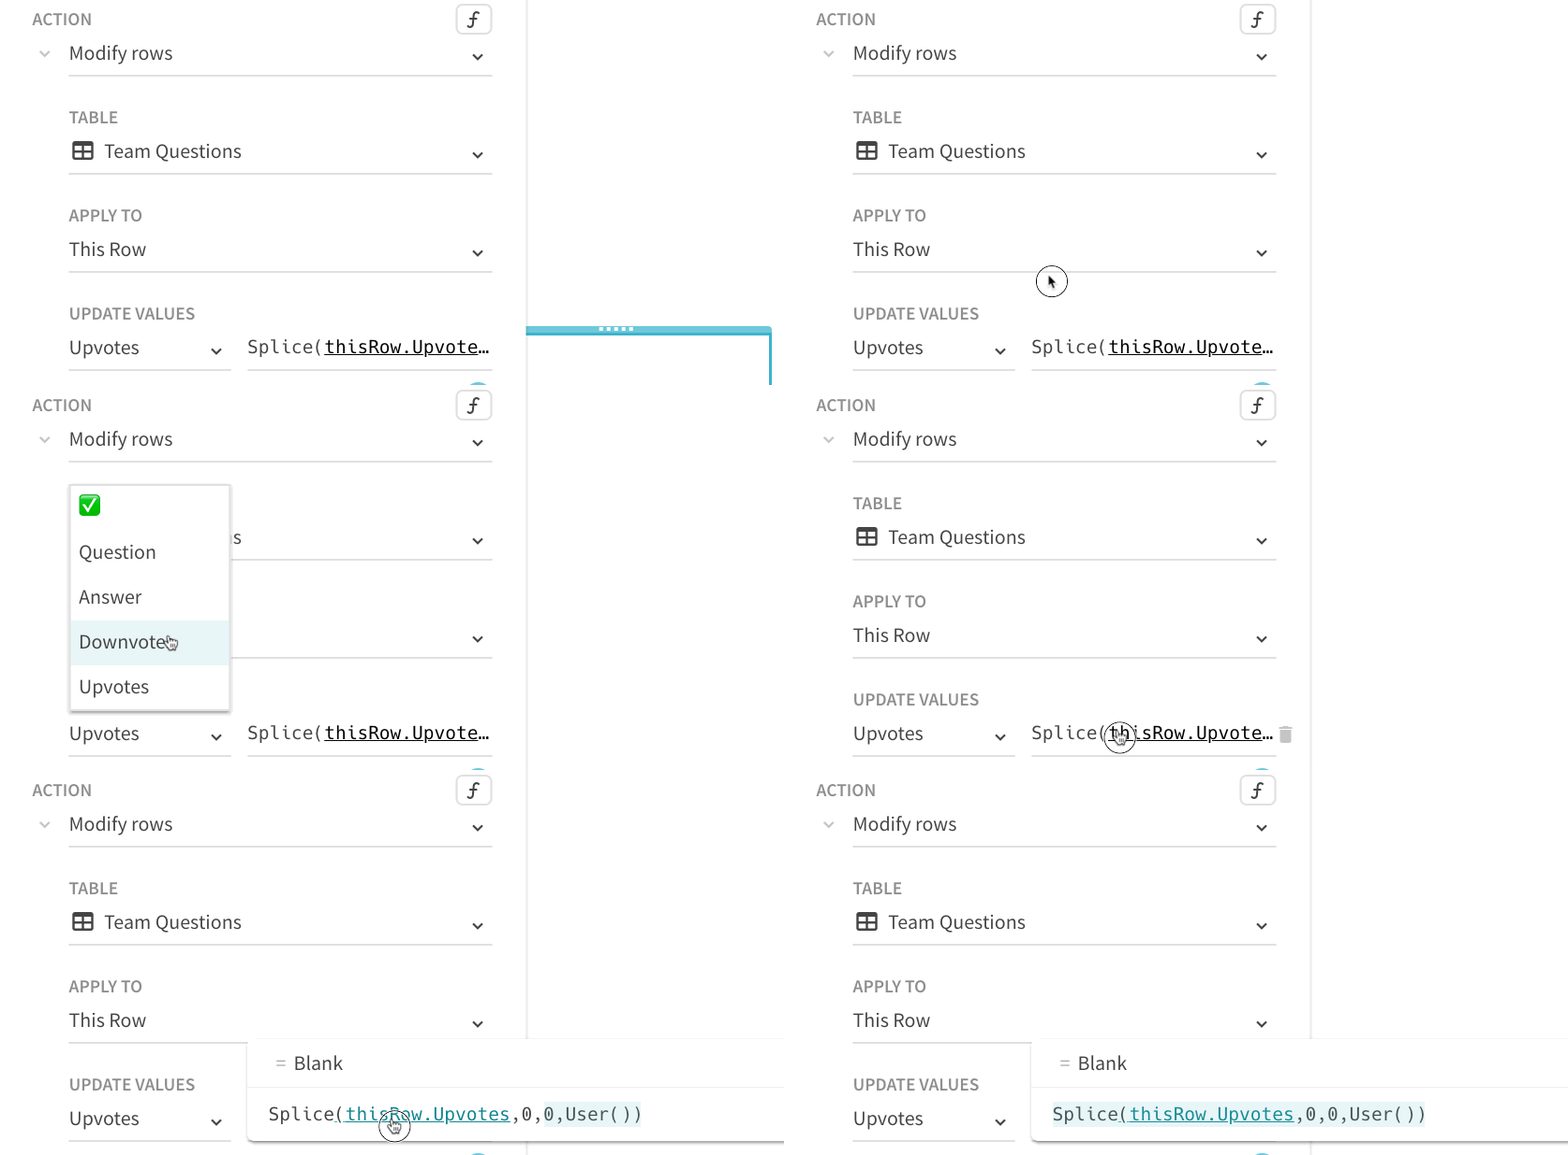

In the Vote Up column that contains our upvote button, you are going to modify the current row when the button is pressed. You modify the Upvotes column by writing the following formula:
=Splice(thisRow.Upvotes,0,0,User())
The formula is typically used when you want to insert some values into a list but also replaces items in that list. In this formula:
When it’s all said and done, all this formula does is add the current user (your teammate that is hitting the upvote button) to the Upvotes column so that this column will have a cumulative list of all the people who hit the upvote button! There is no deleting of values with this formula. In the gif below, you’ll see that I get added to the Upvotes column when I hit the upvote button:
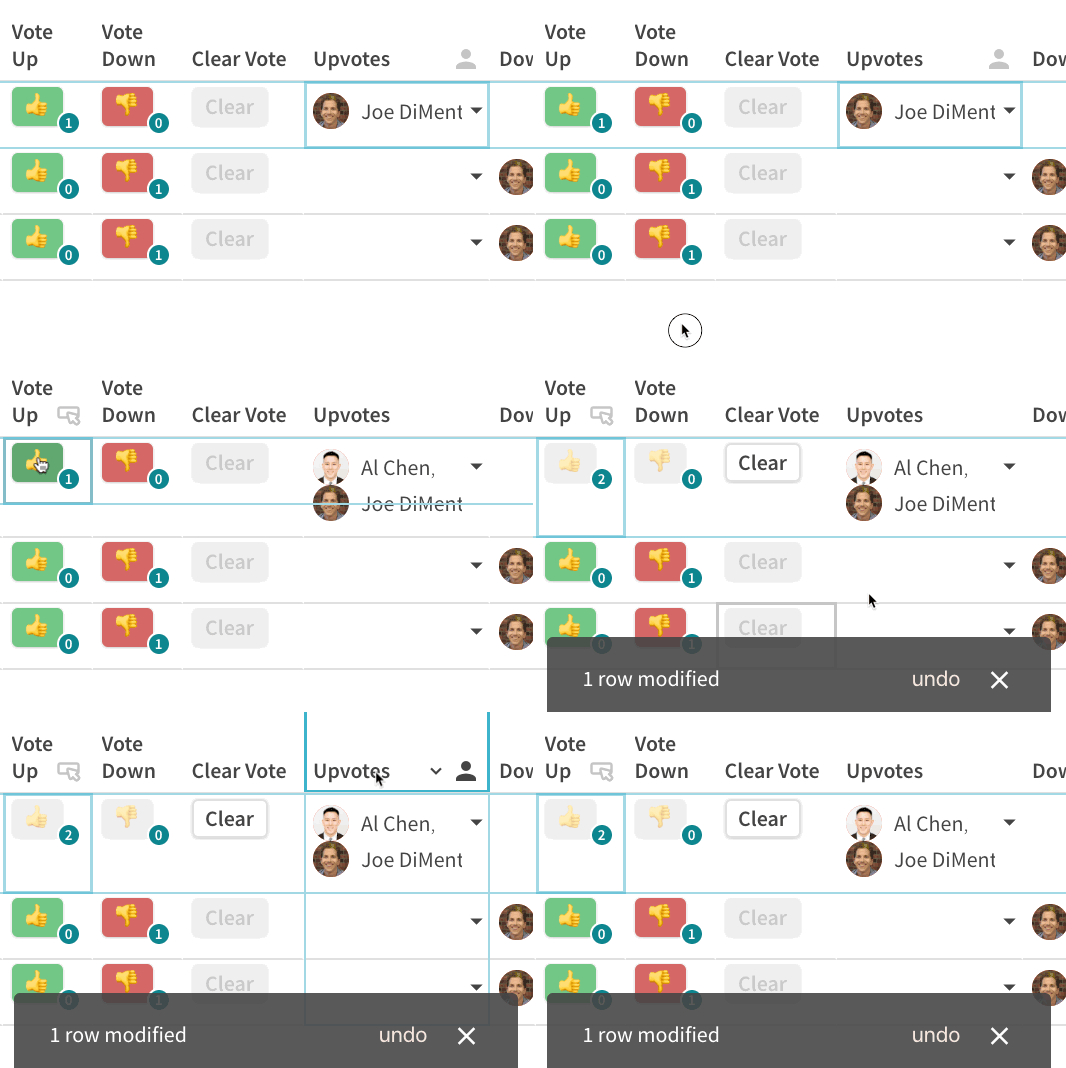

A few other things to make this voting doc user-friendly:
Disabling the button when someone has voted or downvoted


The formula basically looks to see if the current user is in the Upvotes or Downvotes columns. If they are, then disable the button:
=thisRow.Upvotes.Contains(User()) OR thisRow.Downvotes.Contains(User())
Badges on the buttons


In the button right-hand corner of the button, you can show the count on the number of people who have upvoted or downvoted for the question. Put the following formula in the “Badge” form on the button”
=thisRow.Upvotes.Count()
Clear button
In our voting doc, we only let the person upvote or downvote a question once. If that person wants to “clear” their vote and switch their vote, having a clear button makes it easy to remove their current vote.


The formula on this button is a little more complicated. You are also modifying the current row, and the formula looks for the current user in the Upvotes column. If it finds the current user, it filters the user out by using the condition CurrentValue!=User().


We only want to disable the Clear button when the current voter is not found in the Upvotes or Downvotes columns. No point in removing your vote if you haven’t event voted in the first place!
Seeing the voting action
Assuming you followed the steps above for getting the Vote Up button to work, do the same thing for the Vote Down button but switch the places where the Upvotes column was mentioned for the Downvotes column. Here our little voting doc in action:
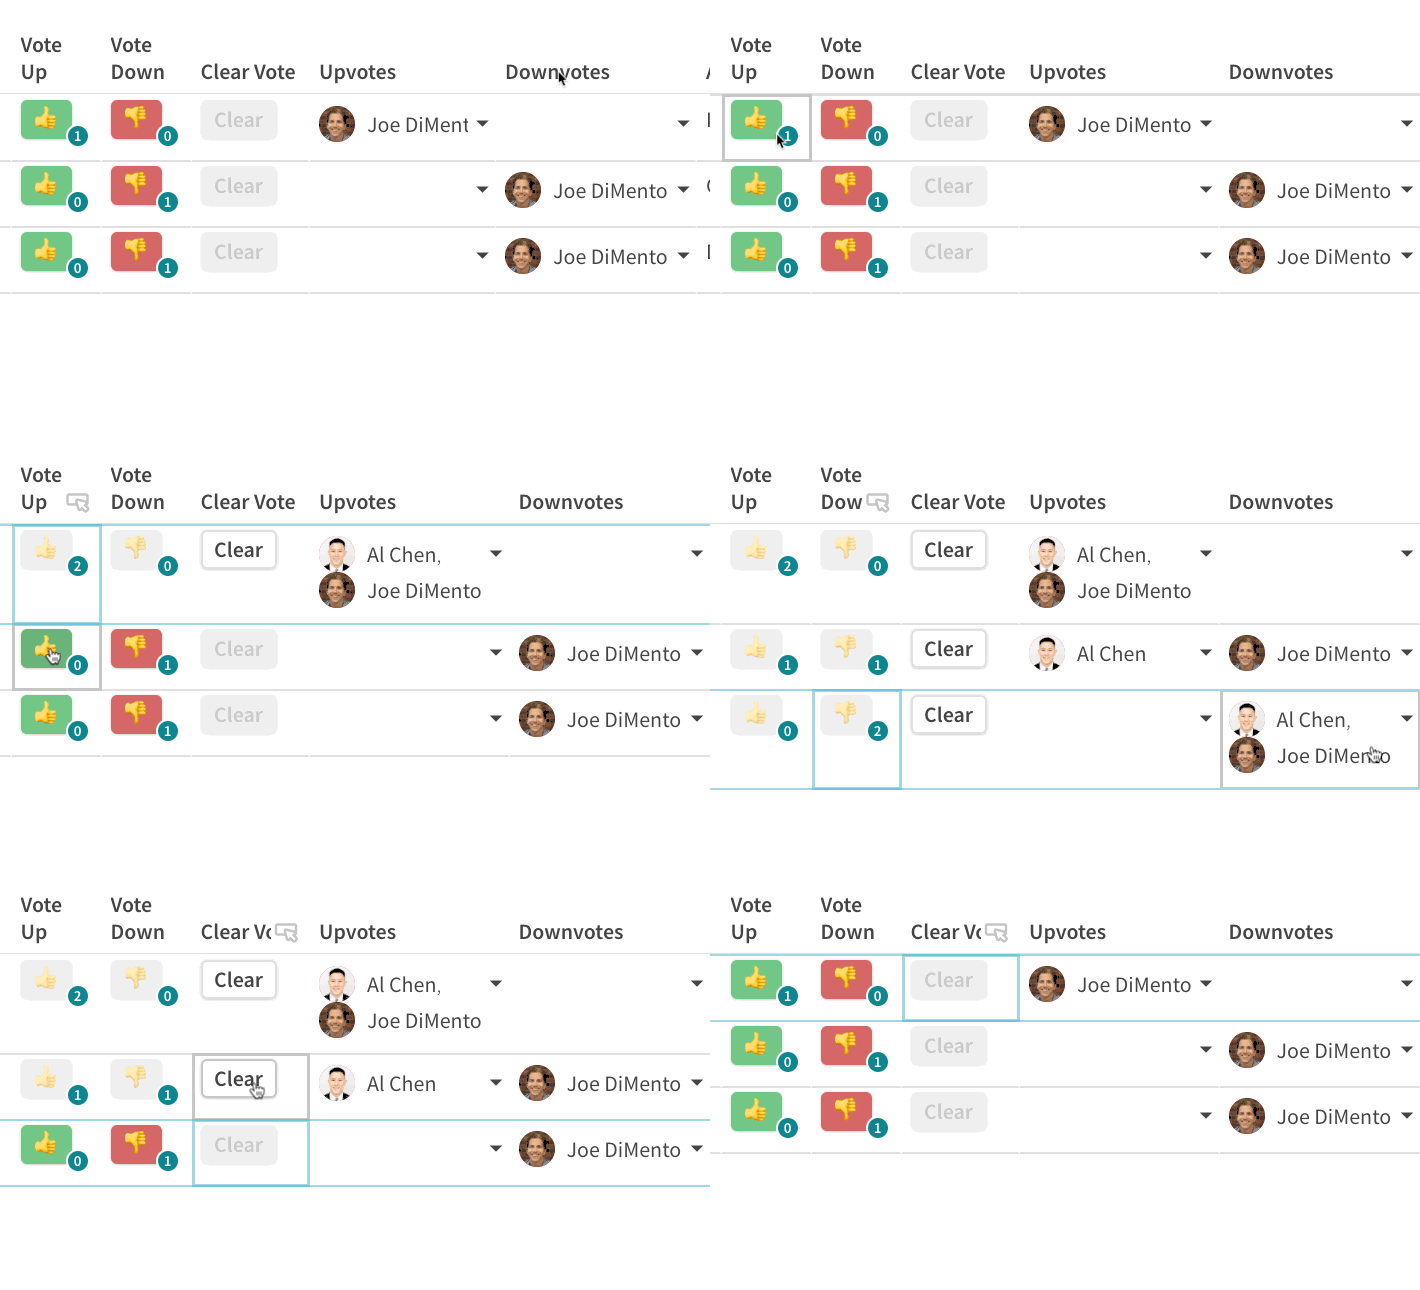

Sorting Questions
One of the most important parts about this voting doc is to make sure the questions that get the most upvotes go to the top of the list. Add two columns to your table: Votes Up and Votes Down that simply count the number people in the Upvotes and Downvotes columns, respectively:


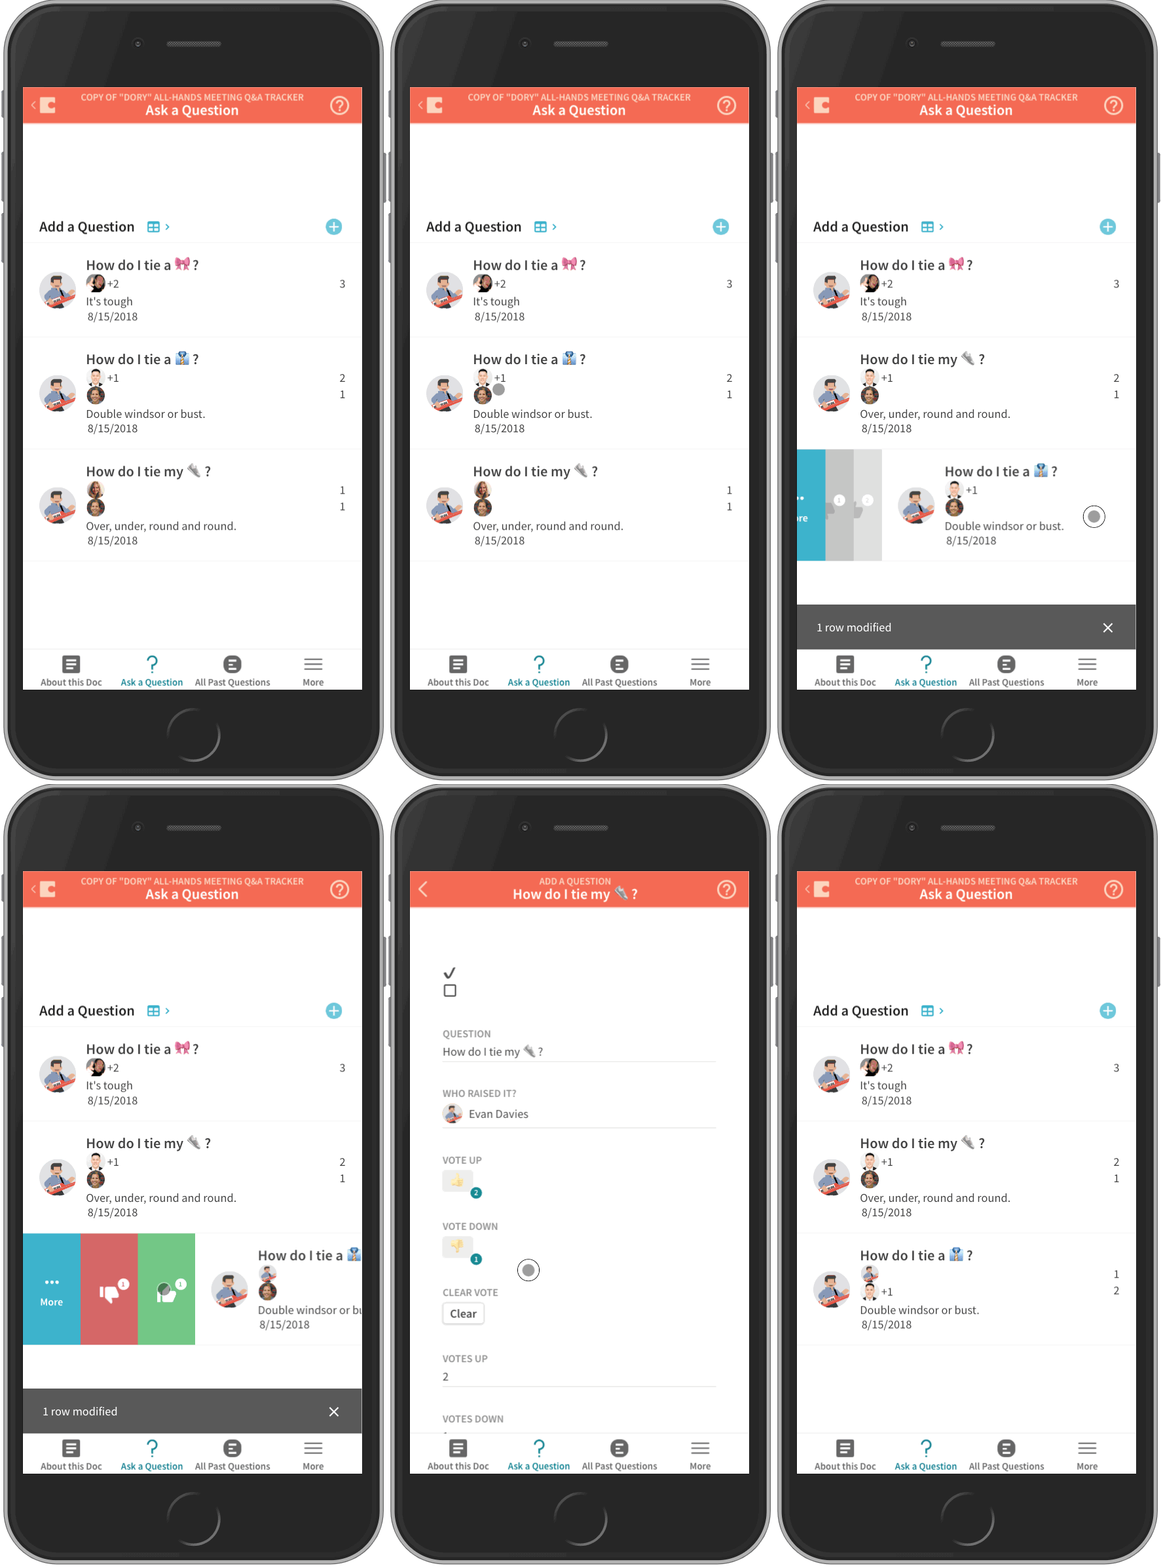
The formula is one of the most powerful formulas in Coda since it can count the number of items in a list or number of rows in a table. More importantly, the Votes Up column is sorted by descending order. This means that as people are upvoting a question, the table will automatically get sorted based on the Votes Up column in real-time. In Google Sheets, you would have to re-sort the list every time someone added their vote to a question. This can get pretty cumbersome if you have an all-hands of 100 people. Here is what the real-time voting and sorting looks like. The third question on the table raised by Evan (“How do I tie a 👔?”) only has one vote so far. After I vote for it, it moves up to the 2nd position in the table:


Filtering Questions by Date or Completed
You’ve seen how this little voting doc can basically replace a live polling or voting application. While this works great for a standalone meeting, you can add more functionality to this doc if you want. If you conduct multiple team meetings a month, you might want to have a Date Added column. This is similar to the Who Asked the Question? column. Instead of using the CreatedBy() formula, we just use Created():


The reason you might want to have this column is to filter the list of questions based on a certain meeting date. You don’t want to see any questions from previous meetings, so this is a quick way to filter out questions from the past.
We also haven’t talked much about the check box column ✅.
During the Q&A, as the speaker answers the questions in the doc, the meeting owner can click on the checkbox to indicate the question has been answered. The table can have a filter that simply filters out rows in the table that have been checked off:


[✅]=false
In the , there is a “All Past Questions” section that contains a view of the main questions table. This view shows all the questions that have the check mark column as true so you can see an archive of all your answered questions.
Voting For Questions on Your Phone
A lot of the live polling software I mentioned at the beginning of the post make it easy for your team or audience to cast their vote with the help of a mobile app. In terms of making this “easy” for the audience, this could mean simply browsing to a specific link which allows the audience member to vote. In the worst case scenario, the team member has to download a custom app and enter in a code to access the survey or poll.
With this voting doc, your team member just needs to be shared the doc, and it renders on your phone like an app. In the gif below, you can swipe on the question to upvote, downvote, or access additional options making the experience feel more app-like:

No More Awkward Q&A


Credit: Tenor
No more waiting to raise your hand to ask the question you’ve been wanting to ask since the last all-hands. No more wondering if your question is relevant to the audience. No more confusion over the same questions being asked in different ways. No more wondering if the question was asked at a previous meeting.
This tutorial shows you how to build your own live audience Q&A, polling, and voting doc with one simple table and a few formulas. It all starts with a blank canvas.
Find freedom on the canvas. ー Bob Ross
Live Polling Apps FAQ
What is the best polling app software?
The 3 main polling apps on the market are Poll Everywhere, VoxVote and Slido. However, choosing the best one depends on your specific needs. Traditional polls are multiple choice questions, but we believe that meaningful audience feedback comes from empowering them to share their real opinions.
Why should you conduct live polls in meetings?
Live polls are an effective way to engage with your audience, gather feedback from respondents, and document discussions during your virtual event.
What is the best way to communicate poll results?
With a tool like Coda, everything is documented on the doc and archived. Simple share the Coda doc with your attendees and everyone will have access to all question types and answers.
A few of the 25,000+ teams that 🏃♀️ on Coda.


Coda is an all-in-one doc for your team’s unique processes — the rituals that help you succeed. Teams that use Coda get rid of hundreds of documents, spreadsheets, and even bespoke apps, to work quickly and clearly in one place. This template is a Coda doc. Click around to explore.
Find out how to Coda-fy your rituals.
Want to print your doc?
This is not the way.
This is not the way.

Try clicking the ⋯ next to your doc name or using a keyboard shortcut (
CtrlP
) instead.